
![[July 6 and 7] DX realized by content cloud, advanced platform for business transformation](https://website-google-hk.oss-cn-hongkong.aliyuncs.com/drawing/article_results_9/2022/3/9/6bbafe438d78271513761788166cbf94_0.jpeg)

Running the ASCII.jp SDL application in a drive simulator type test environment (Part 1)
SmartDeviceLink (SDL) is an open-source common standard that connects in-vehicle devices such as car navigation systems with smartphones. In addition to being able to safely use the smartphone app on the car navigation screen and voice, the main feature is that the app can read the speed of the car while driving and the status of the blinkers and wipers. Therefore, when developing SDL applications, we want a test environment that is as close as possible to the running of an actual vehicle. From this time, we will introduce the test environment using the drive simulator twice.
Manticore is recommended because it is easy and convenient, but it has limitations
In this series, so far, we have used a web-based development environment called "Manticore" and a development kit that uses hardware called "BootCamp". I have the SDL app working. In particular, Manticore, which allows you to try SDL applications on a cloud basis, is very easy and convenient, so of course we recommend it. However, Manticore is not very good at simulating real-time vehicle information. For example:
●Vehicle speed can be easily set with a slider, etc., but it is difficult to reproduce simulation data in which numerical values draw a gentle curve in time series, just like driving a real car ●Mouse operation is basic Simultaneous simulation such as "turning the steering wheel while changing the engine speed and vehicle speed" is difficult because the parameters are set in . There are not enough hands ● It is assumed that the application will be installed in multiple cars and operate organically (linked with each vehicle's latitude and longitude information, wipers, brake lights, etc.), and a simulation for that is necessary. When you have more than one hand to operate the Manticore
As a method of simulating and testing the real-time vehicle information of the SDL application, there is of course a method of using an actual vehicle. It is possible to attach various devices to the car, extract vehicle information data, and pass it to SDL compatible devices to operate it. But even here there are some challenges.
● Cost is high because a physical device is required. In addition to the vehicle itself, you also need an OBD2 adapter and a microcomputer.-Vehicle information has different specifications for each manufacturer and model, so it is not easy to prepare general-purpose information.-If you do not have a driver's license, debugging and Impossible to experiment ●Debugging and experimenting while driving is dangerous because you cannot concentrate on driving if you are alone. Multiple people are required to operate and check the app with the driver ●Because legal compliance is required, situations such as 150km/h cannot be tested
In the meantime, is there any way to achieve a simulation that is closer to real vehicle information than Manticore, but is it easier than using an actual vehicle?
That's right, let's use the "automatic driving simulator"!
A self-driving simulator is a virtual city in which many cars are automatically driving. In recent years, the quality of self-driving simulators has improved dramatically. In addition, some of them are open source, and it has become quite familiar.
So, this time, we will use this as a simulation environment for the SDL application. Autonomous driving simulator becomes a test environment of drive simulator type if you operate your own car by hand. There are several simulator candidates, but I decided to adopt one from an open source project called "CARLA Simulator".
This CARLA can be operated with the following two things.
●Windows or Mac ●Credit card to pay for AWS
CARLA Sumilator can also drive your own car using steering wheel controllers and foot pedals used in racing games. As a result, you can proceed with the test with a feeling that is much closer to the actual vehicle compared to the Manticore.
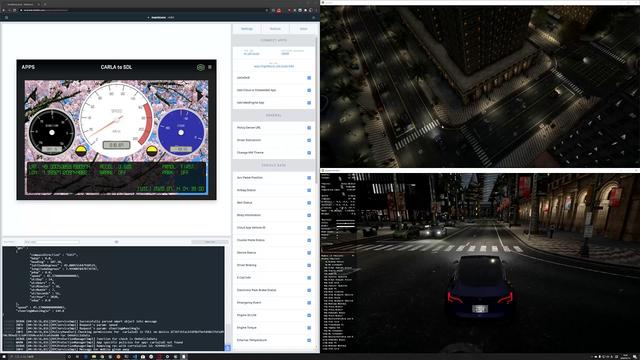
Now, what kind of test environment can be created using a driving simulator? Let's introduce a video of the test environment we're about to create in action. I will introduce this in detail in the second part, but I will test the SDL application by moving the car in the virtual space of CARLA Simulator.
So let's start working towards this goal!
Let's prepare with AWS
Since the autonomous driving simulator requires various calculations, it is recommended that the PC running it has a GPU. Therefore, I decided to use an instance equipped with a GPU from AWS (Amazon Web Service).
In addition, Ubuntu seemed to be more suitable as a development environment, but I think that there are many people who are relatively accustomed to operating Windows, so I am preparing in the Windows environment here.
*If you have a Windows 10 machine with a GPU, please skip ahead. From here on, the environment settings on AWS will continue for a while.Please complete AWS account registration (payment method registration, etc.) from this page.
First, prepare the instance from the EC2 console. Let's open [List of AWS EC2 instances]. Please make sure that the upper right is the [Tokyo] region.
List of AWS EC2 instances
Let's click Create Instance.
AMIs
Enter “nvidia windows” in the AMI search box. Next, select [AWS Marketplace] from the categories on the left.
Then you will see the AMI information "NVIDIA Gaming PC - Windows Server 2019", so let's check it and click [Select].
Checking AMIs
Then you will see the recommended instance and its price for using this AMI.
Of course, the higher the price, the smoother the future work will be, and the virtual city will be beautifully animated, but for now, we will choose the cheapest instance. An instance called g4dn.xlarge costs about 100 yen/hour.
* In addition to this, network usage fees and storage capacity fees will also be charged, but generally the largest cost is the instance fee, so please be careful here.Let's click [Continue] after confirming the pay-as-you-go billing.
Select instance type
Select [GPU instance] as the filter condition.
Select instance type
And if you scroll down a bit, you'll find an instance called g4dn.xlarge. Select this and click Next Step.
Setting Instance Details
From here, we will enter the setting of the network environment. If you have created a VPC so far, it is OK to recommend using it. As a point of caution, depending on the availability zone and instance type, there may be times when you cannot create an instance, so please be careful not to get caught in that.
Let's click Create a new VPC. Another window will open.
A VPC is a region of your network. This time, in that network area, it will be like placing one instance of CARLA Simulator running.
Creating a VPC
When you see this screen, select [Create VPC].
Creating a VPC
Let's set the following and click [Create].
Name Tag: CARLA VPCIPv4 CIDR Block: 10.0.0.0/24IPv6 CIDR Block: No IPv6 CIDR Block Tenancy: Default
For example, create a VPC for an application that organically links multiple cars.
Creating a VPC
Let's click [VPC] on this screen.
Creating an internet gateway
Create an internet gateway to connect your VPC to the outside world. Click Create Internet Gateway.
Creating an internet gateway
Let's give it a name and let's go fast.
Completion of internet gateway
The created Internet gateway must be attached to the VPC.
Attach to VPC
From the available VPCs, select the [CARLA VPC] you created earlier and click [Attach Internet Gateway].
Creating a subnet
The network related settings will continue.
Creating a subnet
Name tag: CARLA SubnetVPC: CARLA VPC Availability Zone: ? ? ?
The availability zone changes depending on the timing. I feel that ap-northeast-1d is safe, but if you get a failure message such as "Instance could not be prepared in the specified Availability Zone" in the subsequent process, respond flexibly as appropriate please give me.
IPv4 CIDR block: 10.0.0.0/26
Let's click Create.
Route table configuration
In the route table filter settings, filter as VPC = CARLA VPC.
* If this is your first time setting up a VPC, only one item should be displayed here, so there is no need to apply a filter. Let's select her route table, which is connected to CARLA VPC, and click Edit Route.Edit route
Select [Add route], set it to 0.0.0.0/0, select Internet Gateway (CARLA Gateway) as the target, and click [Save route].
Let's give the route a name
This is not an essential task, but it will be easier to understand later, so let's click the "pencil icon" of the route you just set up and name it [CARLA Route].
*The pencil icon will appear when you hover the mouse over it.This completes the settings around the VPC.
Let's go back to the screen that was left open in another tab or something.
Return to setting instance details
At this point, if you click on the network [refresh icon], you should see your CARLA VPC.
Network: CARLA VPC Subnet: CARLA Subnet Auto Assign Public IP: Enabled
Choose as above and click Next Step.
Add Storage
Let's change the default size of 30GiB to about 100GiB. If you have the money, you might get a slightly better simulator performance by choosing a different, more expensive volume type, but I'll stick with the most reasonable general-purpose SSD (gp2) first.
Add atag
Add atag
Let's name the instance we're going to launch.
Name: CARLA Server
Let's click Next Step.
Security Group Configuration
Let's create a new security group. Since we are only using RDP (Remote Desktop Protocol) this time, set only that rule.
This is the security rule setting for this instance, "Where will you connect to the remote desktop from?" Here, if you select "My IP" as the source, her IP address in the environment you are working on will be automatically set.
Add this value each time you change the location of your work, such as your company and home, or a coworking space, or if your IP address changes after you restart your home router.・Please respond by changing it.
Confirm instance creation
We are finally ready. Launch.
Before that, there is one more step. Key pair settings.
Configure key pair
If you already have a key pair, you can use it. If you are new to AWS, select [Create a new key pair], set the key pair name [carla], and click [Download key pair]. This file is very important, so please keep it in a safe place.
Now it's really time to create an instance (=start). Created status is displayed.
Creation status
When you click the instance name, [Initializing] is displayed, so wait for a while until the instance starts (about 5 minutes).
Initializing
[Very Important]
●From the moment you launch an instance, you will be charged for using the instance. If you are going to take a break for a meal after this, please don't forget that "instance usage charges continue to be incurred". increase. If you want to take a break for a meal after this, please don't forget that "Instance usage charges continue to be incurred". Even if you don't use it, you will be billed about 70,000 to 80,000 yen in a month. Please note earnestly
Status check
When the status check is [2/2], booting is complete. Then click Connect.
Connect to instance
[Download Remote Desktop File] allows you to download a simple configuration file for remote desktop connection.
In Windows, this is a file that is displayed with an icon like the one below.
RDP icon
On a Mac, the icon looks like this:
RDP icon
In addition, a password for the administrator is automatically issued to the launched instance. should get it. In some cases, when you click [Get Password], the following screen appears.
Get password
In this case, please wait a few more minutes. If all goes well, you will see the following screen.
Get password
Here, select the key pair file called carla.pem that you saved earlier. And if you select [Composite password], the administrator password of the instance just launched will be displayed.
Get password
This is important, so please make a note of it. The password is too long and hard to remember, so you can change the password as soon as you have a remote desktop connection after this.
RDP icon
Double-clicking this icon will display the following.
Enter your credentials
Enter the password you just combined here and select OK. how is it? "Did you see the Windows desktop?"
Security Warning
There may be cases where such a screen appears during the process, but please select [Yes] to proceed.
Go to the App Store and install Microsoft Remote Desktop.
Microsoft Remote Desktop
After that, double-click the remote desktop file you downloaded, the following icon.
RDP icon
Then it will look like this:
Enter your account
Enter the following here and proceed with [Continue].
Username: AdministratorPassword: complex password
Did you see the Windows desktop?
Come on, CARLA Simulator
Launch a browser in the Windows of the AWS instance connected to the remote desktop. You should have a Google Chrome icon on your desktop. Please open here.
CARLA
Open this page and click [CARLA 0.9.9 release] on the right side. Then, in the middle of the screen after that, it will look like this.
CARLA
Click [GET CARLA 0.9.9]. This will open the Github releases page.
CARLA
Here, let's download the next two.
[Windows] CARLA_0.9.9.4.zip
[Windows] AdditionalMaps_0.9.9.4.zip
They are large, 2.8Gbyte and 1.5Gbyte respectively, but the download speed will be relatively fast as they will be downloaded to AWS.
CARLA
First, decompress (expand) CARLA_0.9.9.4.zip. We will work in the Download directory. Unzipping this zip file will take quite some time. It may take more than 10 minutes, but please wait.
Next, unzip the Additional Maps. Here, you need to specify the directory to unzip to.
Additional Maps
Decompress it so that it overwrites the CALRA_0.9.9.4 that you decompressed earlier. Therefore, specify the decompression destination as follows.
./CARLA_0.9.9.4/WindowsNoEditorThis will also take a few minutes, but the following dialog will appear during the extraction.
Save overwrite
We want to overwrite, so select [Replace the files in the destination].
Double-click./CARLA_0.9.9.4/WindowsNoEditor/CarlaUE4. A warning will be displayed.
CARLA
Click More Info and let's proceed with Run anyway.
CARLA
CARLA
It will tell you that you need two things:
Microsoft Visual C++ 2015 RuntimeDirectX Runtime
Okay, we're ready. If you search for “Visual Studio C++ 2015 Runtime” in your web browser, you will reach the following screen.
Visual Studio C++ 2015 Runtime
Choose Download.
Visual Studio C++ 2015 Runtime
When asked for x86 or x64, choose the 64bit version. After the download is finished, install it.
Next, if you search for [DirectX Runtime], you will reach the following screen.
CAR DirectX RuntimeLA
Download and install. Then, when you double-click [./CARLA_0.9.9.4/WindowsNoEditor/CarlaUE4] again, did the following screen appear?
CARLA
Is the CARLA Simulator running? "Have you seen the virtual city?" "This screen can be operated as follows."
[W] Forward [S] Backward [A] Move left [D] Move right [Q] Down [E] Up [mouse drag] Change camera direction
Fly around the city and look around. At this time, if you launch [Task Manager], you can clearly see that both the CPU and GPU are working.
CARLA
It's still an empty city with no cars or people. Python is used to add the functions of the automated driving simulator, such as cars and people. We will use Miniconda for Python environment settings.
https://docs.conda.io/en/latest/miniconda.htmlminoconda
Let's download [Python 3.7 Miniconda3 Windows 64-bit] from this page.
miniconda
Then install. Click [Next] to continue.
From the start menu, click [Anaconda Powershell Prompt (Miniconda)].
miniconda
Proceed to configure Python related modules.
pip
$ cd .\Downloads\CARLA_0.9.9.4\WindowsNoEditor\PythonAPI\$ cd .\carla\$ pip install -r .\requirements.txt$ cd ..\examples\$ pip install -r .\requirements .txt$ cd ..\util\$ pip install -r .\requirements.txt
Go ahead with these commands.
Try the following in.\Downloads\CARLA_0.9.9.4\WindowsNoEditor\PythonAPI\util\ .
$ python .\config.py --list
A map list and a weather list are displayed to choose from. Let's set the map to Town01 and the weather to Light Rain Day.
$ python .\config.py --map Town01 --weather SoftRainNoon
town01
Did the display change? "Please take a look around the city." There are puddles on the ground. Now let's go to High resolution map, Sunny day.
$ python .\config.py --map Town10HD --weather ClearNoon
town10hd
This completely changed the atmosphere of the city. beautiful. At the same time, I think my movements have become heavier. Due to its high resolution, it is a map that uses a lot of CPU and GPU.
In this way, we will proceed with the work while setting the CALRA Simulator with python.
From the util directory, go to the examples directory and run.
$ cd ..\examples\ $ python .\dynamic_weather.py
town10hd
The rain comes and goes, the wind picks up and goes down. If time passes and there are not many clouds, you may be able to see the sunrise and sunset. You can also see the starry sky at night. You can stare at it forever.
An empty city is lonely. Let's make a car appear like an automatic driving simulator. Also, let people walk. You can stop the program that changes the weather once ([Ctrl]+[C] to stop), but let's make cars and people appear while continuing to change the weather.
Let's launch another [Anaconda Powershell Prompt (Miniconda)] from the start menu.
$ cd .\Downloads\CARLA_0.9.9.4\WindowsNoEditor\PythonAPI\examples\ $ python .\spawn_npc.py -n 50 --car-lights-on
-n 50 means 50 cars, --car-lights-on is an option to turn on the headlights because the city was dark.
town10hd
The car has started. I'm driving automatically.
* You may see an error-like display in the terminal, but don't worry about it for now.Looking around the city, it looks like there are no pedestrian lights in this city. People cross the road regardless of traffic lights. However, the car stops when it recognizes a person crossing, preventing an accident. The self-driving simulator is working.
Next, let's drive (operate) the car. Let's launch another [Anaconda Powershell Prompt (Miniconda)] from the start menu.
$ cd .\Downloads\CARLA_0.9.9.4\WindowsNoEditor\PythonAPI\examples\ $ python .\manual_control.py
A screen like a new car racing game opened.
* At this time, the car model is randomly selected, so there are cases where motorcycles and bicycles are displayed instead of cars.manual_control
If the movement seems too slow, stop the [weather change program] or [program that makes cars and people appear] with [Ctrl]+[C]. The operation method is also displayed on the terminal screen, but I will briefly introduce it.
[W] Accelerator [S] Brake [A/D] Steering wheel [Q] Reverse gear switch [Space] Handbrake [P] Switch between automatic and manual operation (default is manual operation) [M] Manual/automatic [,/.] Gear switching during manual operation [L] Light switching [SHIFT] + [L] High beam ON/OFF [Z/X] Turn signal ON/OFF [I] Interior light ON/OFF [ 1-9] Change sensor [C] Change weather [Backspace] Change vehicle type [ESC] End
When using a remote desktop connection, if the screen size of your computer is large, the size of the screen transferred from the remote desktop will also be large. may be delayed. In such a case, there is also a setting to lower the resolution, so please try it. Do the following:
Remote desktop connection
Choose Show Options.
Specify a size that is easy to use according to your environment, such as 1280x720 or 1920x1080.
Be sure to stop the instance when you are finished. Please be aware that you will continue to be charged if the instance is left running.
Instance stop
Although the AWS instance launching relationship has become a very long explanation, I explained it step by step as much as possible. Because computers don't work with just one setting. Especially around the AWS VPC, it is easy to make a setting mistake. If it doesn't work well, luckily there are many explanations on the web about AWS, which is a salvation. Please refer to this information as you proceed with the settings.
In the second part, we will finally connect the information of the car running in CARLA Simulator to the SDL application. Please stay tuned!
Organizer: SDL App Contest Executive Committee (Secretariat: Kadokawa ASCII Research Institute) Cooperation: SDL Consortium Japan Subcommittee Application deadline: Friday, January 15, 2021 24:00 Recruitment content: Emulator or development kit SDL-compatible apps developed above (existing apps compatible with SDL, new development) Recruitment target: age, gender, nationality, etc. Both individuals and teams can apply Application method: Submit a presentation sheet and a video explaining how it works via a web form Judging: Judges will evaluate novelty, UX/design, implementation skill, etc. Final judging: Early March 2021, Scheduled to be held in Tokyo Grand Prix: Prize money 500,000 yen + supplementary prize Special prize (up to 5 works): Prize money 100,000 yen each Official site: http://sdl-contest.com/
(Provided by SDL Consortium Japan Subcommittee)